Getting Started with ShellOverlays
Requirements: CBFS Shell
Introduction
The ShellOverlays component allows your application to add custom overlay icons to files and folders in File Explorer. Applications can visually indicate additional status information directly on top of file and folder icons, such as version control states, synchronization statuses, or other custom metadata. Before continuing, it is recommended to download the latest version of CBFS Shell to follow along with this guide.
Configuring Overlay Icons
The first step in using the component is to configure the overlay icons that File Explorer should display. The OverlayIcons collection is automatically prepopulated with ten icon slots your application can use to define overlay icons. Each slot represents an icon that can be registered with the system. To configure an icon in a slot, set the IconPath property to specify the file that contains the icon, set the IconIndex property to indicate its index within that file, and enable it by setting Enabled to True.
import callback.CBFSShell;
ShellOverlays m_Overlays = new ShellOverlays();
// Only configure the first icon in the 'OverlayIcons' collection
OverlayIcon icon = m_Overlays.OverlayIcons[0];
// The path to a file that contains your icons. This can point to an .exe, .dll, or .ico file.
icon.IconPath = "C:\\PATH\\TO\\ICON\\FILE.ico";
// The index of the icon in that .dll file
icon.IconIndex = 1;
// This must be set to true for the icon to be visible in File Explorer
icon.Enabled = true;
Installation
The next step is to call the Install method. This will load a proxy dynamic link library (DLL) into File Explorer to facilitate communication with the Windows Shell. In addition, this will prompt the component to register the configured overlay icons to the Windows Registry. Installation should be done at least once before using the library on a new system, but it may be done several times to update the desired icon configurations.
m_Overlays.Install();
Defining File Masks
After installation, specify which files and folders are candidates for receiving overlay icons by using the IncludeMasks and ExcludeMasks properties. The IncludeMasks property specifies which files and folders are eligible for overlays, although ExcludeMasks can override these selections.
// Only consider overlays for .txt files in the "Documents" folder
m_Overlays.IncludeMasks = "C:\\Users\\User\\Documents\\*.txt";
// Exclude any files named "test.txt" from receiving an overlay icon
m_Overlays.ExcludeMasks = "C:\\Users\\User\\Documents\\test.txt";
Initialization and Activation
Once the overlay icons and file masks are configured, call the Initialize method to perform necessary setup tasks. Then, call the Activate method to start processing Windows Shell requests and display the overlay icons.
m_Overlays.Initialize();
m_Overlays.Activate();
Displaying Overlay Icons
While the component is active, the UseIcon event will fire for each file or folder that matches the previously defined file masks. This event is fired just before an item is displayed in File Explorer, providing your application with an opportunity to decide whether a candidate overlay icon should be applied.
When the event is fired, the FilePath parameter contains the full path of the file or folder being evaluated, and the Attributes parameter provides its file system attributes. In addition, the IconNumber parameter identifies which candidate overlay icon from the prepopulated OverlayIcons collection is being considered. Initially, the Use parameter is set to False. If your application determines that the overlay icon should be applied to the item, simply enable the icon by setting Use to True.
m_Overlays.OnUseIcon += (sender, e) =>
{
    // Identifies the candidate overlay icon from the OverlayIcons collection.
    var iconNumber = e.IconNumber;
    // The full path of the file or folder being evaluated.
    var filePath = e.FilePath;
    // File system attributes of the file or folder.
    var attributes = e.Attributes;
    // Display overlay icon 0 for the current file or folder
    if (e.IconNumber == 0)
    {
        e.Use = true;
    }
};
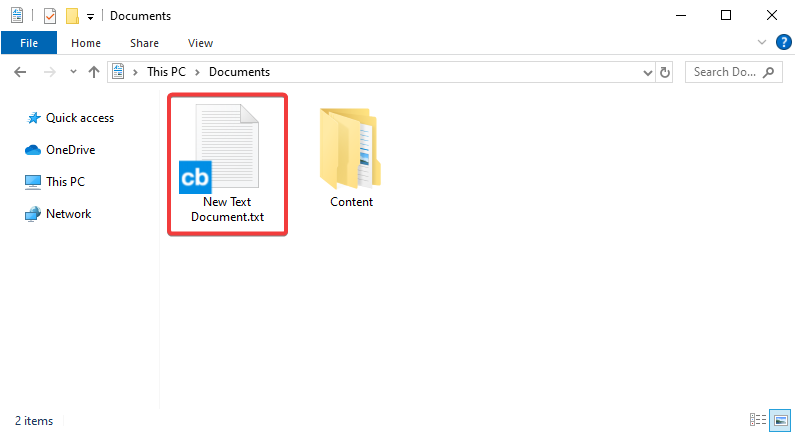
Once the Use parameter is set to True, the overlay icons should be visible in File Explorer on top of any files or folders the event was fired for.
Deactivation and Uninstall
To stop serving overlay icons while keeping your configuration intact, call the Deactivate method.
m_Overlays.Deactivate();
To unregister the overlay icons from the Windows Registry, call the Uninstall method. This action will also unregister the proxy DLL File Explorer, which typically is performed when your application should be removed from the system.
m_Overlays.Uninstall();
We appreciate your feedback. If you have any questions, comments, or suggestions about this article please contact our support team at support@callback.com.